MinIO S3 (and Filestash)
S3 is a storage API first implemented at Amazon AWS, but has since been copied and re-implemented as open source MinIO. MinIO is a service you can install to centrally store files in your network via the S3 API. With a web frontend like Filestash, you can host a file manager webapp for easy file sharing.
sequenceDiagram
    participant Browser as FileStash UI - Web Browser
    participant FileStash as FileStash static server
    participant Minio as Minio S3 - Object store

Browser->>FileStash: HTTP request for static app page
FileStash->>Browser: Response with static app page
Browser->>Minio: Direct API request for object data
Minio->>Browser: Direct response with object data
Running MinIO on a single Raspberry Pi is perfect for personal use. However, for heavier production use, you will need to plan to use beefier hardware with redundant storage.
Configure MinIO
pi make minio config
MINIO_TRAEFIK_HOST: Enter the minio domain name (eg. s3.example.com)

: s3.pi.example.com

MINIO_CONSOLE_TRAEFIK_HOST: Enter the minio console domain name (eg. console.s3.example.com)

: s3-console.pi.example.com

MINIO_SITE_REGION: Enter the self-described region of the server (eg. default)

: default

MINIO_ROOT_USER: Enter the minio root username (eg. root)

: root

? Do you want to enable sentry authorization in front of this app (effectively making the entire site private)?
> No
  Yes, with Mutual TLS (mTLS)
Enable admin console (optional)
The admin console is optional and it is blocked by default. If you want to access the console, you must unblock it, by providing your client IP address:
## Unblock the console for your specific IP address:
pi make minio reconfigure var=CONSOLE_SOURCERANGE=X.X.X.X/32
To allow any IP address access to the minio console use 0.0.0.0/0:
## To unblock the console for any IP address:
pi make minio reconfigure var=CONSOLE_SOURCERANGE=0.0.0.0/0
Once installed, the console will be accessible at
https://s3-console.pi.example.com. You will need to enter the
username (root) and the password can be retrieved from the
.env_{CONTEXT}_{INSTANCE} file:
## To retrieve the minio console root password:
pi make minio dotenv_get var=MINIO_ROOT_PASSWORD
XxXxXxXxXxXxXxXxXxXxXxXxXxXxXxXxXxXxXxXx
Install MinIO
pi make minio install wait
Add two new routes on the sentry
Create a route for S3 and the console:
sentry route set --layer7 s3.pi.example.com 10.13.16.2 443 --proxy-protocol false --restart false
sentry route set --layer7 s3-console.pi.example.com 10.13.16.2 443 --proxy-protocol false --restart true
You may also create the route interactively through the Traefik config menu.
Create an S3 bucket and credentials
pi make minio bucket
Create the bucket name: demo and then leave the policy, group, and
username blank to use the same value:
Enter a new bucket name (test): demo
Enter a new policy name (demo):
Enter a new group name (demo):
Enter a new user name (demo):
This will create the bucket and the output the endpoint and access credentials, which is all of the information necessary to provide access:
Bucket: demo
Endpoint: s3.pi.example.com
Access Key: demo
Secret Key: XxXxXxXxXxXxXxXxXxXxXxXxXxXxXxXxXxXxXx
Configure Filestash instance
It is likely you will want several instances of filestash for different buckets, so you you should configure them separately as named instances:
## Create an instance named test:

pi make filestash config instance=test
FILESTASH_TRAEFIK_HOST: Enter the filestash domain name (eg. filestash.example.com)

: filestash-test.pi.example.com

? Do you want to enable sentry authorization in front of this app (effectively making the entire site private)?
  No
  Yes, with HTTP Basic Authentication
> Yes, with Oauth2
  Yes, with Mutual TLS (mTLS)
sentry authorization is a requirement as the S3 credentials are stored in the filestash client (i.e., web browser), therefore you should not allow anyone you do not trust with this information to access the page.
? Which authorization group do you want to permit access to this app?
> admin
This will allow only the admin authorization group to access this
instance.
Remember, you can create extra authorization groups in the Traefik config, that way you can have separate user access per instance.
Install the Filestash instance
## Install the instance named test:

pi make filestash install instance=test
The build process for filestash may take awhile, as it is built from source code. This is because the upstream images were out of date for ARM64.
Add a new route on the sentry
sentry route set --layer7 filestash-test.pi.example.com 10.13.16.2 443 --proxy-protocol true
You may also create the route interactively through the Traefik config menu.
Open Filestash
Open the URL in your browser: https://filestash-test.pi.example.com.
- The initial page will ask you to create an admin password.
Administer Filestash
The admin page is only accessible from
https://filestash-test.pi.example.com/admin/, and it is here you
must configure the storage backend.
- Click
Backendin the menu. - Remove every backend except for
S3. - Do not select any authentication middleware.
- Click the icon in the upper left to go to main page, or simply go
to
https://filestash-test.pi.example.com/.
On the main page, enter the credentials for the S3 connection:
- Click
Advanced - Enter the Access key ID
- Enter the Secret Access Key
- Enter the Endpoint
- Leave the other options blank.
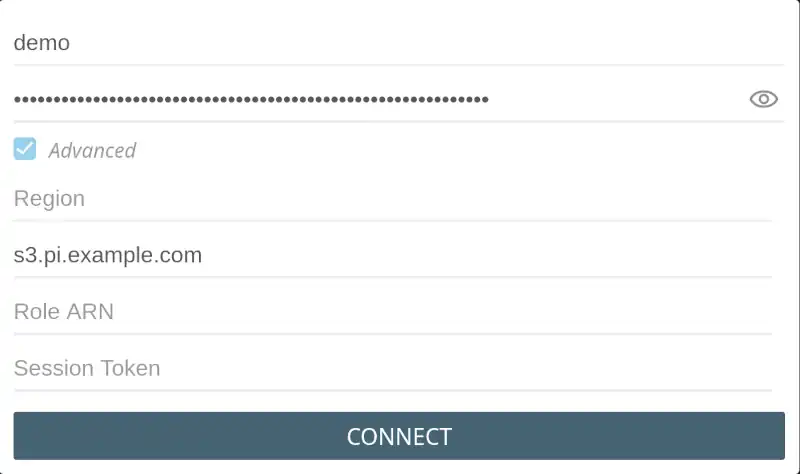
- Click
Connect.
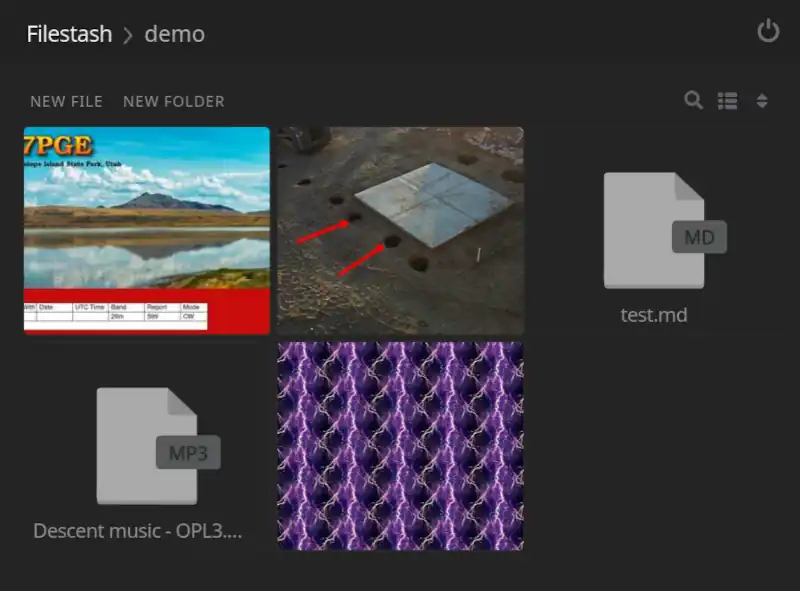
Once logged in you should see a single folder with the same name as
the bucket (test):
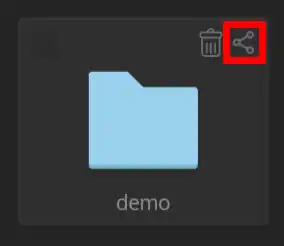
- Click the Share icon in the top right of the folder container.
-
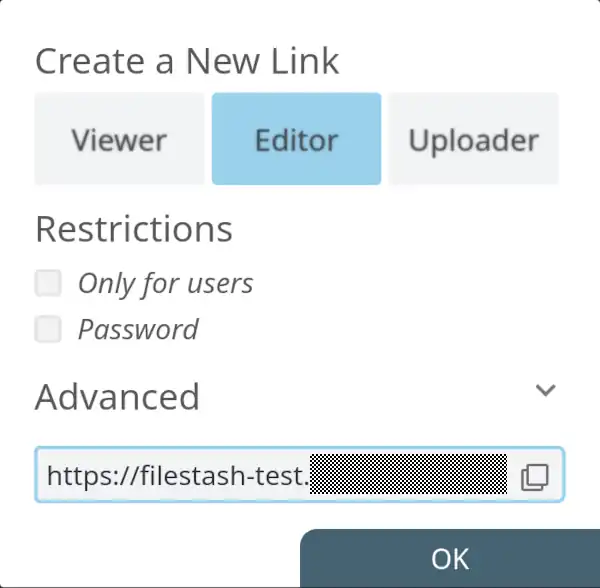
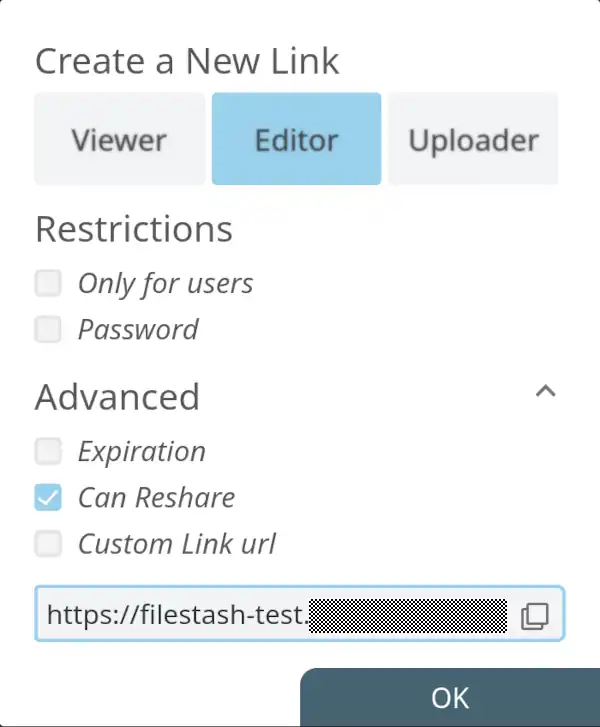
Choose the appropriate permission for the person you are sharing with:
Editorhas full access, download, upload, view, and delete.Vieweris read only.Uploaderis write only (they won’t be able to see any files, not even the ones they upload.)
-
Under
Advancedsettings, you may optionally set an expiration for the link, or customize the link URL. -
Do not set a password, as you can rely upon the sentry authorization instead.
-
Copy the link, and share this link with your friends!
-
Try the link yourself in an Incognito browser window so that you test it with no existing cookies. It should force you to login through Forgejo first, and then once on the filestash page, test the permissions you set are working.
Because you enabled sentry authorization for this route, your friends will also need to create Forgejo accounts, and you will need to add them to the sentry authorization group in the Traefik config.
Create an admin link for yourself, so that you don’t need to enter the S3 credentials again, and you can create new share links too:
- Create a new share link like before.
- Choose
Editorprivilege. - Click
Advanced. - Click
Can Reshare.
Using filestash
-
You can upload multiple files at a time by draging and dropping them directly from your computer’s file manager into the browser window (FYI the dropzone is only near the top of the page).
-
Many media types are supported with rich viewers, including images, audio, and video.